
game-data-editor-2
Date: 9/11/20 Tags: Tools, Svelte, Data, VSCode Permalink: /game-data-editor-vscode-part-2 Summary: Using Svelte for VS Code Custom Editor Webviews September 11, 2020
Date: 9/11/20 Tags: Tools, Svelte, Data, VSCode Permalink: /game-data-editor-vscode-part-2 Summary: Using Svelte for VS Code Custom Editor Webviews Title: Building a Game Data Editor in Visual Studio Code Part 2: Custom Editors, Webviews, and Svelte —
This is part of a series of posts where I discuss building a game data editor inside of Visual Studio Code.
Part 1: Why?
Part 2: Custom Editors, Webviews, and Svelte
Part 3: Getting Data into Svelte
Part 4: Editing Data in Svelte
Getting Started
Having never built a Code extension before, I started this process by walking through Code’s basic extension tutorial, which, in addition to showing me the “how” of building an extension, was a good overview of what an extension actually is inside of Code. I definitely recommend walking through it if you feel like you’re lacking some context around extensions more broadly.
After this, I followed the official documentation on getting Custom Editors set up through a Code extension, and found it surprisingly easy to follow. This was also my first Code extension, so for anyone else thinking that they couldn’t do this because they haven’t made other extensions, don’t worry - you’ll be fine. You can even more or less start by just copying their sample extension, and tweak a few names here and there to give yourself a good template to start with.
Custom Editors
The idea of a Custom Editor is that, upon opening up a specific file type (defined in your extension’s package.json), a webview is rendered instead of the normal text editor that typically appears. This means that the meat and potatoes of the your extension is the HTML displayed by it, and how that HTML is interacted with. Here’s where the HTML code is generated (pulled from the sample extension):
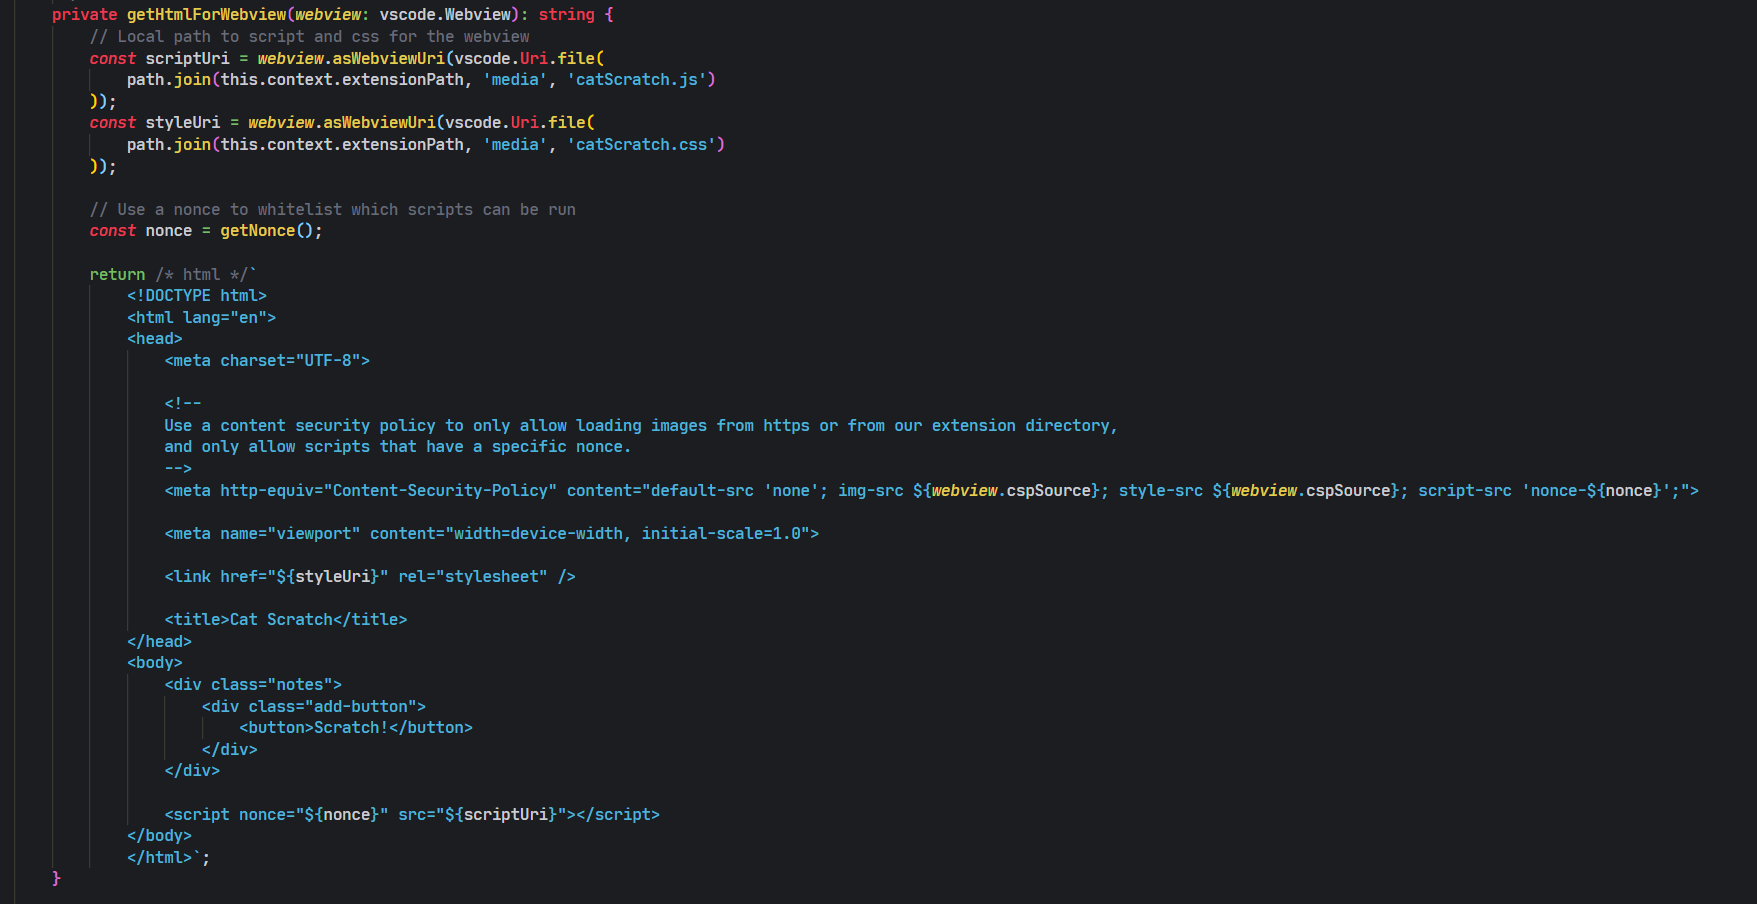
Upon requesting the HTML for the webview (invoked by the opening of the relevant file), the extension (from catScratchEditor.ts here) returns a giant HTML string, embedded with the JS code (catScratch.js here) that drives the functionality of the editor. This JS file emits events that the extension listens for to update the virtual document that represents your file. Because you are making an editor, the idea is that you’re able to make changes to the state of your file (the virtual document) without needing to write those changes to the file itself (until you do actually save the file). The dataflow is roughly this:
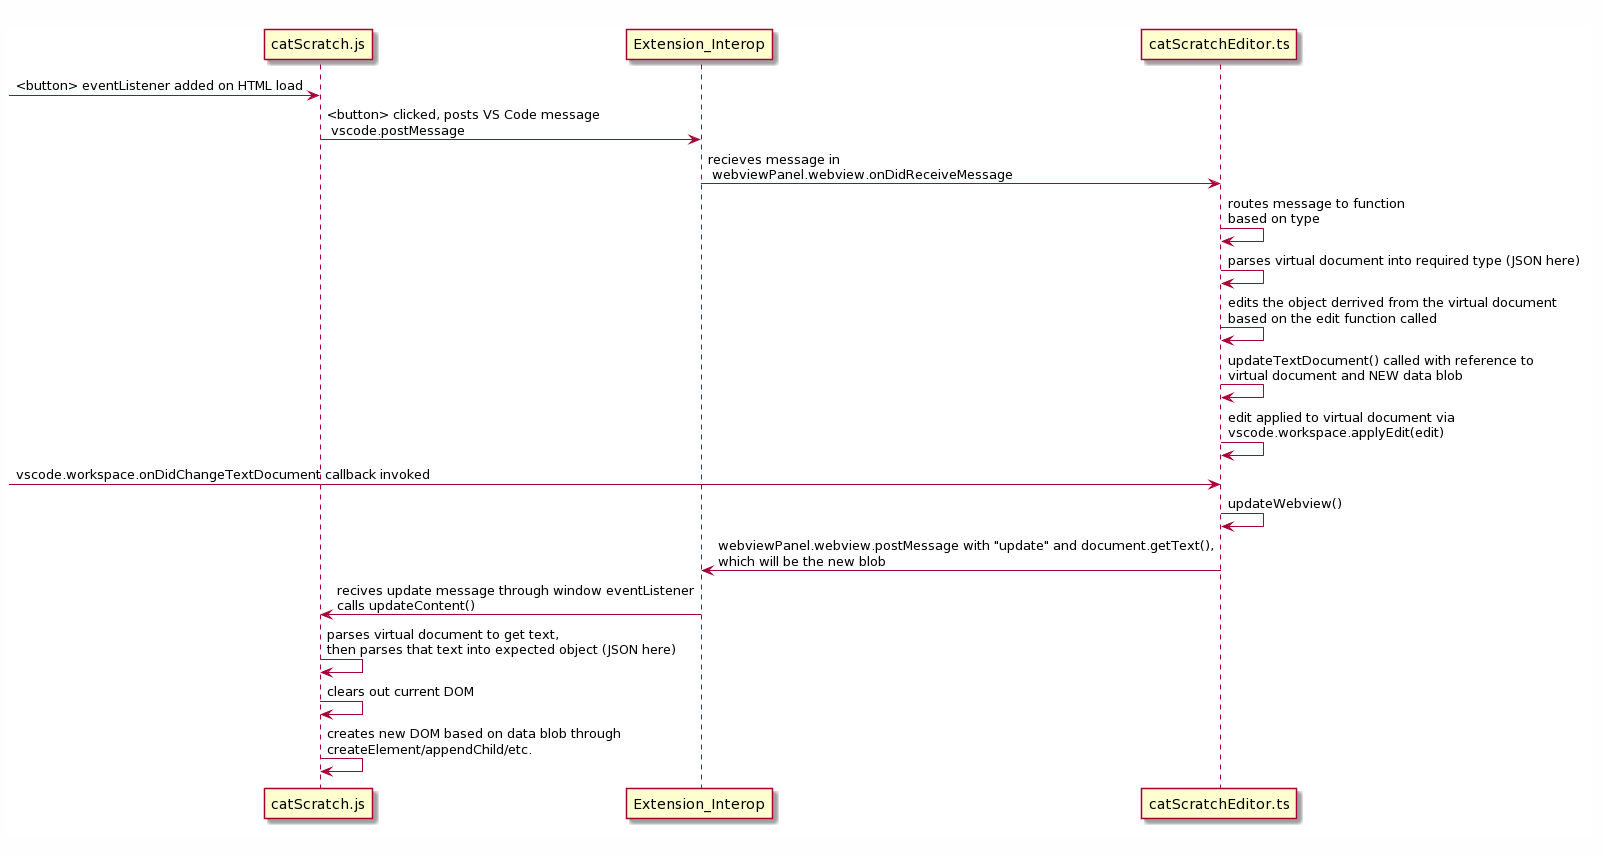
You don’t really need to know this, but it took me a while to trace the callbacks all over the place so I’m diagramming it out in case it helps anyone else.
Default DOM Management
What I want to focus in on in this post though is the last few steps of this diagram, where the DOM is cleared out and rebuilt from scratch inside catScratch.js. For anyone that’s done web development, what’s happening here should look familiar:
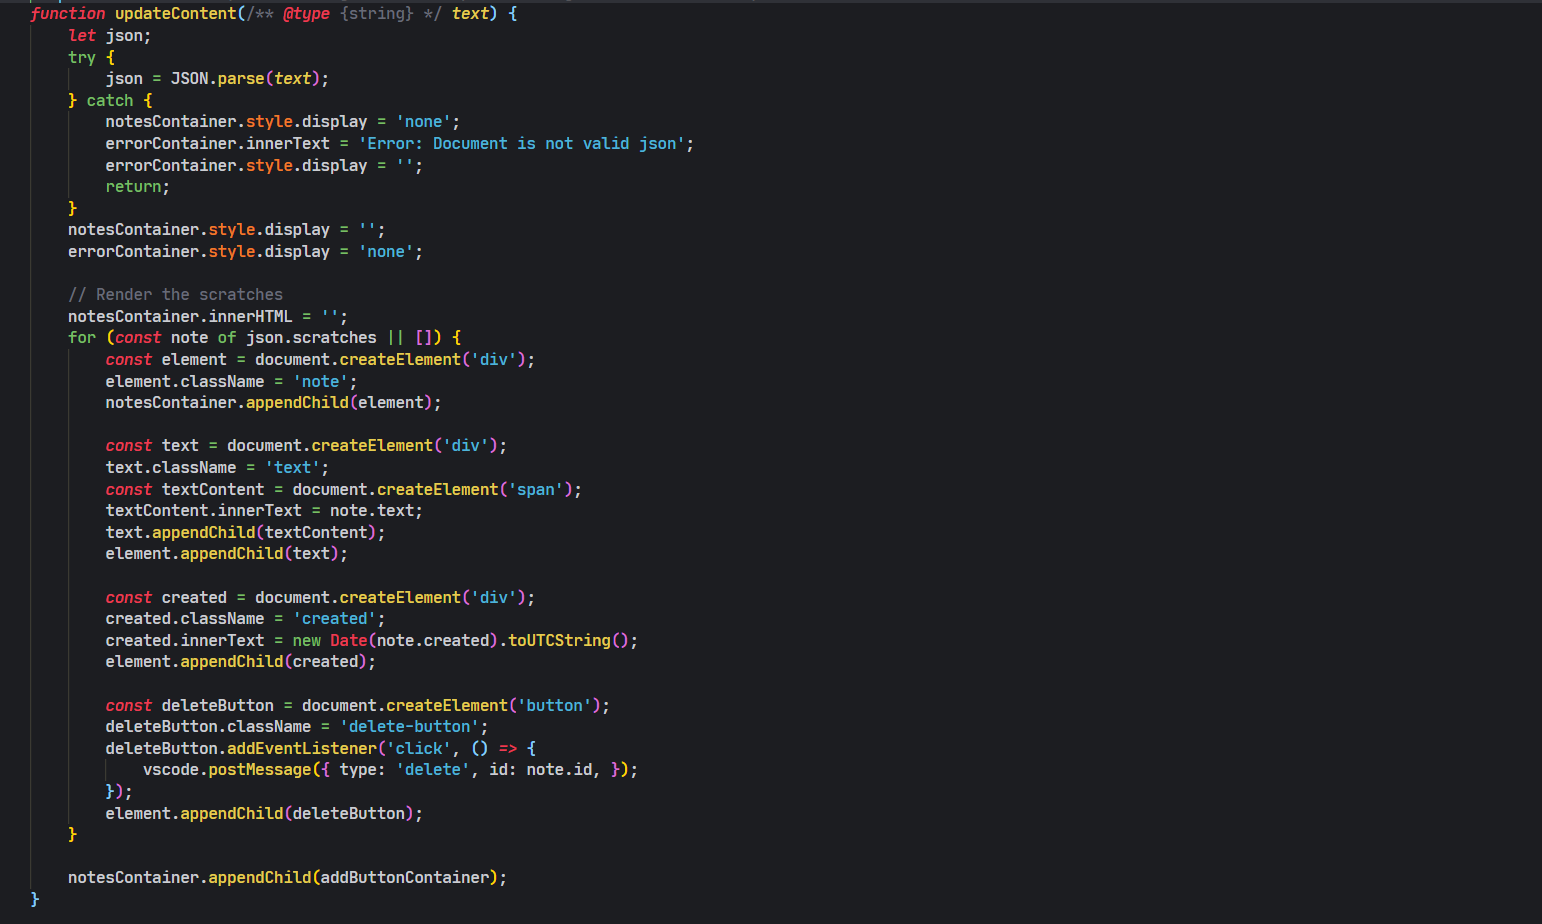
It’s similar to how you would use something like jQuery to rebuild the DOM on page load, dynamically adding and updating elements. For anyone that’s done that for any scale, they know that this can get incredibly tedious quick. Especially if you have complex layouts. Because we are sort of reactively building the DOM from passed in data, we could write out lots of tiny functions that compose the data for the DOM, but that’s still basically spreading the problem out without really getting rid of it.
Because I knew I was trying to make a data editor that would be a complex set of tables, fields, etc., I thought what would be perhaps smarter to do would be to leverage an existing reactive framework and inject that into the extension itself.
Picking a Framework
It also seems I’m not the first person to think of this. However where that linked post uses React, a framework I’m ambiently familiar with, I wanted to use something that was more lightweight and easier (in my mind) to author. Webviews in Code are, per the documentation, costly. Reducing the overhead to render one then is a big priority, especially if an end user is tabbing between multiple data files.
Having recently been experimenting with and really loving Blazor, when I saw how components were authored in Svelte it felt like exactly what I was looking for. For reference, here’s a sample Blazor component:
@page "/counter"
<h1>Counter</h1>
<p>Current count: @currentCount</p>
<button class="btn btn-primary" @onclick="IncrementCount">Click me</button>

@code {
    private int currentCount = 0;
    [Parameter]
    public int IncrementAmount { get; set; } = 1;
    private void IncrementCount()
    {
        currentCount += IncrementAmount;
    }
}
And here’s that same thing as a Svelte component:
//Counter.svelte
<script>
    let currentCount = 0;
    let incrementAmount = 1;
    function incrementCount() {
        currentCount += incrementAmount;
    }
</script>
<h1>Counter</h1>
<p>Current count: {currentCount}</p>
<button on:click={incrementCount}>Click me</button>
Obviously there are some slight framework differences, but they’re pretty similar! Svelte also promised an incredibly small packaged size due to it being compiled before being run, and a general swiftness that makes it quick to react to new changes. All this meant it was a no-brainer for this project.
Tutorial: Getting Svelte into a Visual Studio Code Webview
But choosing a framework is the easy part - actually getting it into Code is a whole different issue! Here’s how I did it.
One major barrier for Svelte and Code is that Svelte, by design, is compiled before being put into a project. Luckily Code extensions go through a similar process of baking, so the working idea, before I dive into the code, is that we’re trying to make it so that Svelte compiles to a directory recognized by the Code extension.
You can get started a few different ways, but what I’ll choose here is the easiest, which will just be getting Svelte code to render in place of the editor already written and provided for by the CatScratch example.
Setup
The first thing we want to do is get Svelte into the project. To start, in a separate directory I made a sample svelte project by cloning down the basic Svelte template repo. I then copied over the main.js and App.svelte files to my extension src folder. I also copied over the rollup.config.js file into the parent directory.
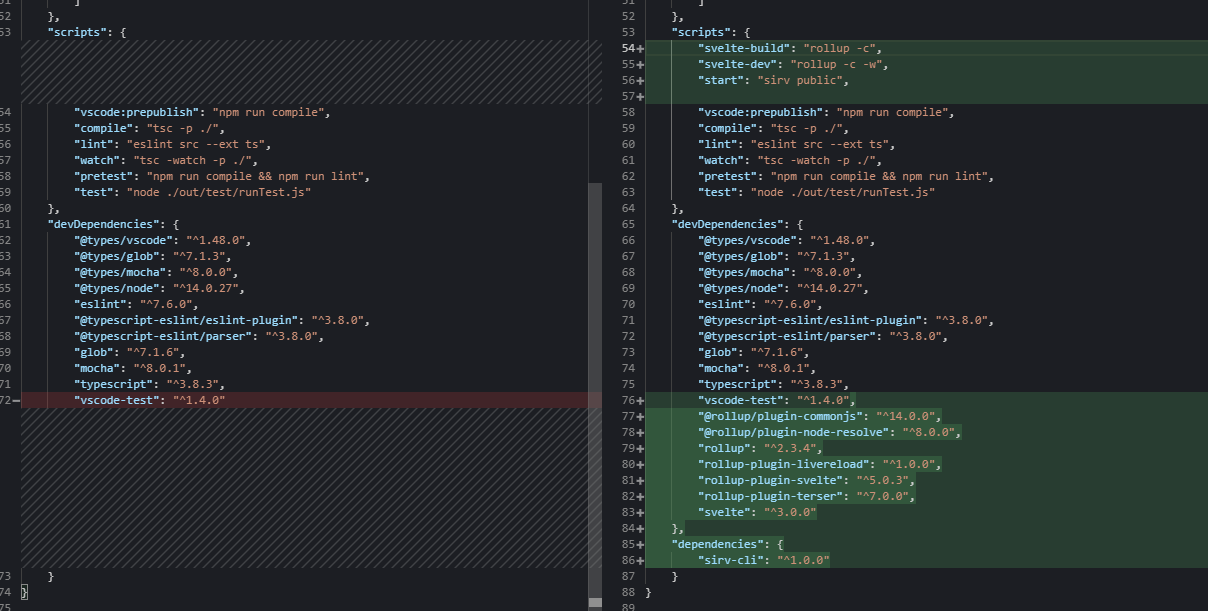
Next, I added in all the npm dependencies for Svelte into the package.json file, as well the additional dependencies and scripts. I then ran npm install to make sure they were all installed and configured. Here’s the diff (note I did slightly change the Svelte script names):
Because Svelte is compiled before being put into the extension, the next step is to make sure the Svelte files all compile and are then added into the rendered HTML for the Custom Editor. This means editing your VSCode Tasks file to include a “build step” for Svelte in your build chain. Here’s how I edited my tasks.json file:
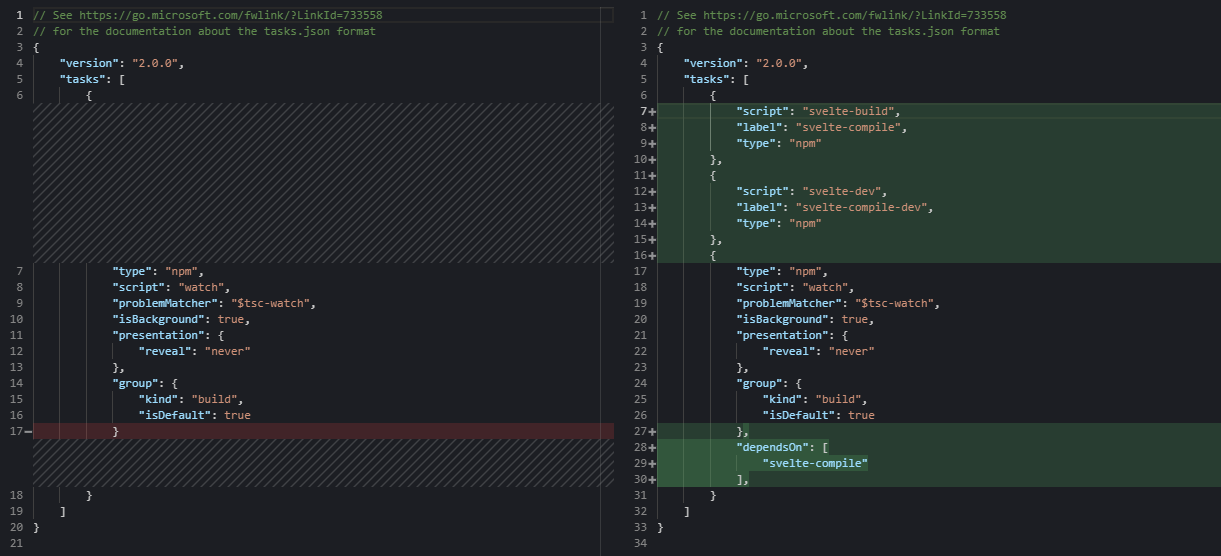
What this says is that, before the build command is executed, run the svelte-compile task, which we can see here runs svelte-build, which is just rollup -c.
Edit Rollup Config
By default, the copied over rollup script dumps the compiled Svelte files into the public/build folder, but what we instead want is for it to dump the files into the output directory extension. This means we just change the output directories in rollup from public/build/bundle.js and public/build/bundle.css to out/compiled/bundle.js and out/compiled/bundle.css.
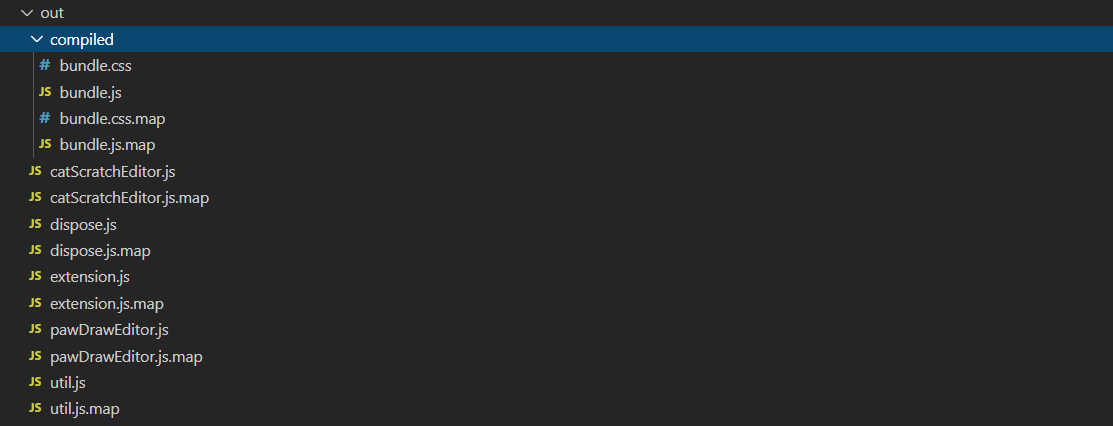
If you run your normal build command now (usually F5), you should see an out directory that looks like this:
However, if you click on the .cscratch file, you’ll still see the default Cat Scratch editor! We don’t want this!
Injecting Svelte
The reason we’re still seeing the editor is because we haven’t actually tied in the compiled Svelte files into the HTML used for the view. To do that, we can just replace the script locations referenced in the catScratchEditor.ts file, changing it from the old script/css references:
const scriptUri = webview.asWebviewUri(vscode.Uri.file(
    path.join(this.context.extensionPath, 'media', 'catScratch.js')
));
const styleUri = webview.asWebviewUri(vscode.Uri.file(
    path.join(this.context.extensionPath, 'media', 'catScratch.css')
));
To this, the new compiled Svelte code locations:
const scriptUri = webview.asWebviewUri(vscode.Uri.file(
    path.join(this.context.extensionPath, 'out', 'compiled/bundle.js')
));
const styleUri = webview.asWebviewUri(vscode.Uri.file(
    path.join(this.context.extensionPath, 'out', 'compiled/bundle.css')
));
If you build it again, you should see this:
And you’ve done it! That’s Svelte, running inside of a Code webview through a custom editor!
Adding VSCode API To Svelte
However before we totally wrap this up, a small crucial missing piece is getting Svelte to interop with Code. If you look in the old catScratch.js file, you can see that, at the top of the script, there is this call:
const vscode = acquireVsCodeApi();Because this is put directly into the DOM via a script in the original version of the editor, this worked fine. However for Svelte, because our component code is compiled and then injected into the DOM, but we still want access to that API, we need to declare the vscode API outside of the Svelte code. This simply means changing your HTML code to include the new script in its body (and adding in the nonce tag):
<!DOCTYPE html>
<html lang="en">
<head>
<meta charset="UTF-8">
<meta http-equiv="Content-Security-Policy" content="default-src 'none'; img-src ${webview.cspSource}; style-src ${webview.cspSource}; script-src 'nonce-${nonce}';">
<meta name="viewport" content="width=device-width, initial-scale=1.0">
<link href="${styleUri}" rel="stylesheet" />
<title>Cat Scratch</title>
</head>
<body>
<!-- Added in this script tag -->
<script nonce="${nonce}">
const vscode = acquireVsCodeApi();
</script>
<div class="notes">
<div class="add-button">
<button>Scratch!</button>
</div>
</div>
<script nonce="${nonce}" src="${scriptUri}"></script>
</body>
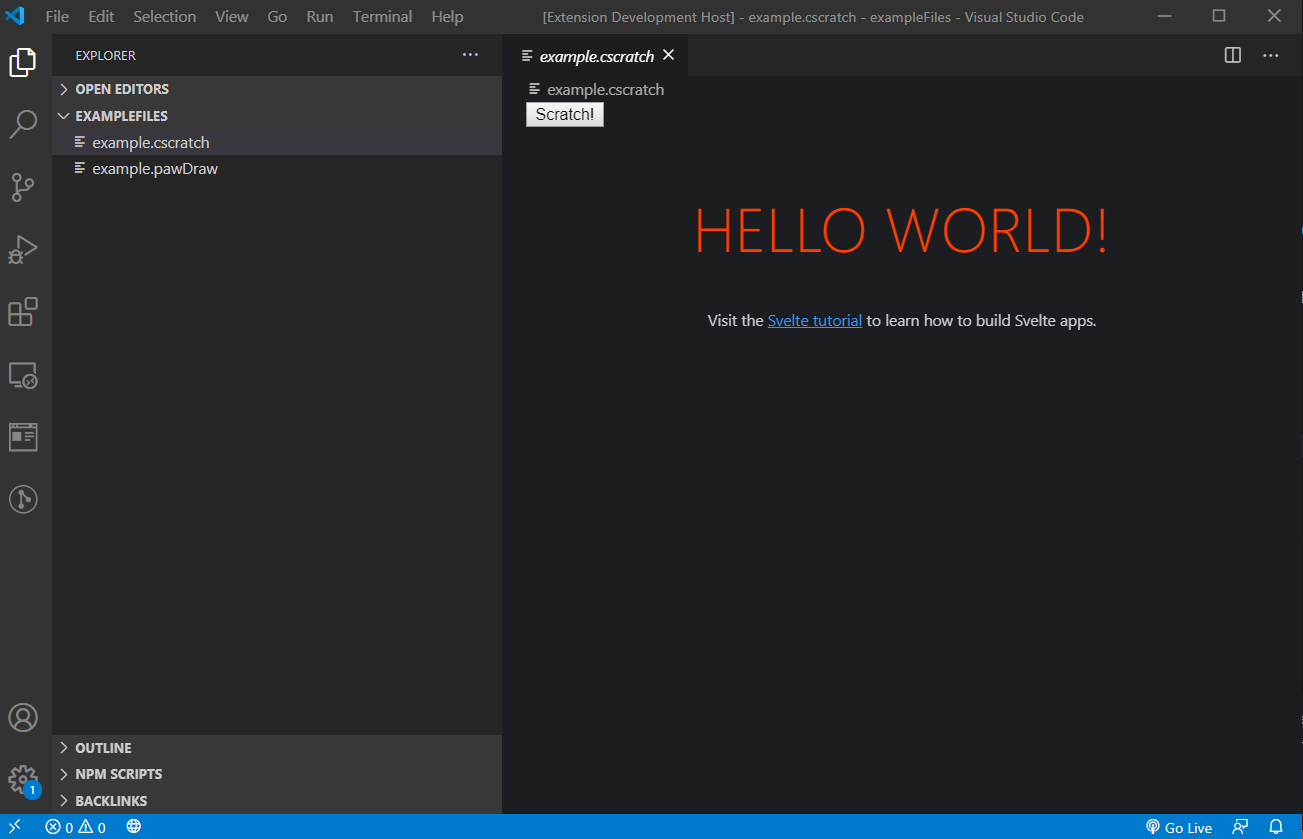
</html>To make sure this works, we can edit App.Svelte to include a Code API call:
<script>
    export let name;
    //added in call here
    vscode.postMessage({
        type: 'apitest',
    });
</script>

<main>
    <h1>Hello {name}!</h1>
    <p>Visit the <a href="https://svelte.dev/tutorial">Svelte tutorial</a> to learn how to build Svelte apps.</p>
</main>

<style>
(omitted)
</style>
And then in our extension (catScratchEditor.ts) catch that message and display a Code information window:
webviewPanel.webview.onDidReceiveMessage(e => {
switch (e.type) {
case 'add':
this.addNewScratch(document);
return;
case 'delete':
this.deleteScratch(document, e.id);
return;
case 'apitest':
vscode.window.showInformationMessage("Hello World!");
return;
}
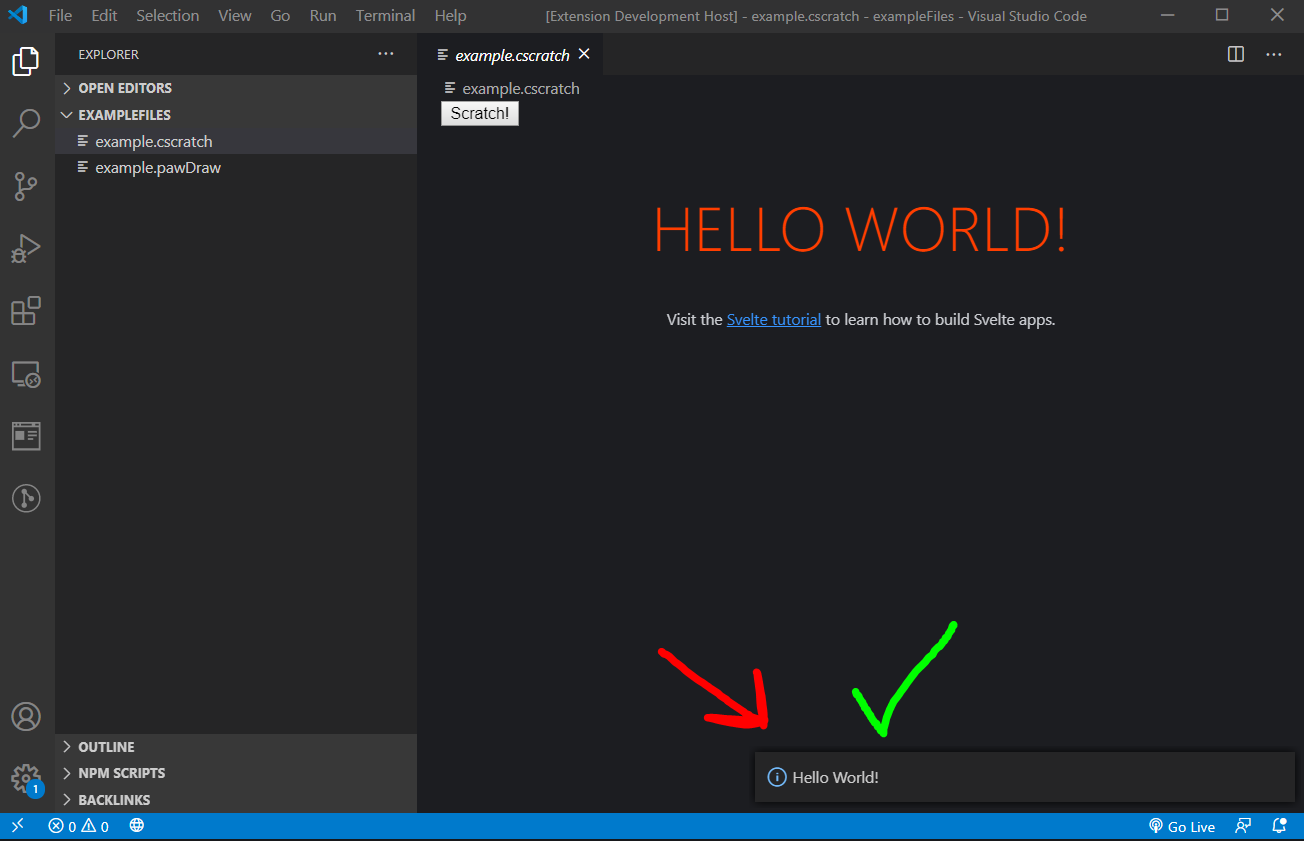
});If we run the extension again, we can see that it works!
Awesome! So to reiterate what’s happening:
We’re authoring Svelte component files that get compiled and injected into the DOM provided to us by a Visual Studio Code webview as part of Code’s Custom Editor API. Whew!
This is just the tip of the iceberg though, but you could still do a lot with this. What’s missing from the above is working with actual data from the .cscratch file in Svelte, which will be the topic of the next part in this series! Thanks for reading and see you in the next one!
This is part of a series of posts where I discuss building a game data editor inside of Visual Studio Code.
Part 1: Why?
Part 2: Custom Editors, Webviews, and Svelte
Part 3: Getting Data into Svelte
Part 4: Editing Data in Svelte
Date
September 11, 2020subscribe to my newsletter to get posts delivered directly to your inbox