
Demystifying Attributes, C#'s Under-Utilized Superpower for Game Development
Exploring the many uses of C#'s attributes in Game Development May 4, 2020 C# Unity

Introduction
If you’ve used Unity, you’ve likely done something like this in your code:
public class MyClass : MonoBehaviour {
  [Range(0,10)]
  public int Test;
}
Specifically, you’ve put that [Range] thing above an int or float field in your class and, like magic, enjoyed that fact that in the inspector you now have a slider to set Test’s value instead of needing to enter its value in a text field:
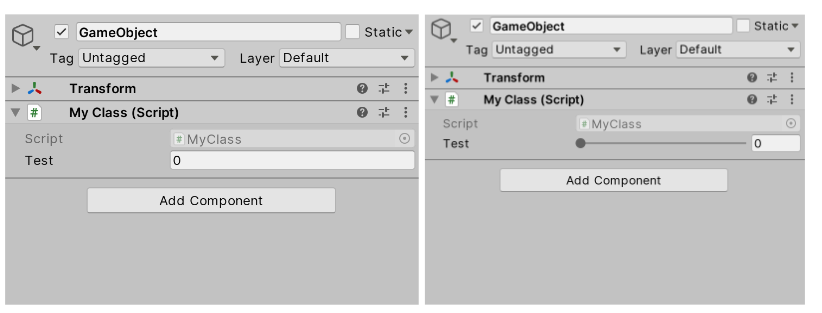
[Range] in the above code is an Attribute, a way of associating metadata with code. Unity offers a handful of other attributes (you’ll likely run into [Header] and [ExecuteInEditMode]) that help you specifically work with Unity things in your code and aren’t really generic and applicable more broadly to scripting work for your specific game.
Beyond the attributes mentioned above, it’s honestly easy to forget they exist. I’d even argue that Unity’s own tutorial’s on the topic imply that attributes are specifically a Unity thing, not a C# thing, their functionality limited to only what Unity provides (one commenter even mentions “Please, more attributes!!!”).
This specific misconception is what I aim to correct in this post, and shine a light on all the amazing, crazy things you (not just Unity!) can do with attributes.
Background
There’s a specific gap when it comes to attributes that is similar to the gap that exists around learning game development at all. An aspiring game developer sees a game like Dark Souls and decides they want to make a game. So they open up a tutorial on getting started in game development and are able to… make a ball roll around. The path from Roll-a-Ball to Dark Souls is unclear at best and dispiriting at worst.
Attributes are similar. Looking at the official C# documentation, attributes are raised as a great way to… add author metadata to a method. Reading even what I’ve typed so far here and then jumping into the documentation could invoke whiplash — “Where is the radical potential here?”
But, like the developer looking for a way to Dark Souls from Roll-a-Ball, there is a path — you just need a little guidance and some imagination. Attributes are exciting, and let me be your guide to tell (and show!) you why.
Attributes
Attributes allow you to attach metadata to basically any code you write. This means an attribute could be attached to a class, field, method, etc. Unity’s (and I mean this as a C# attribute Unity defines for us to use) [Range] attribute, for example, attaches to a float/int field while [ExecuteInEditMode] attaches to a class. This metadata (defined by either the parameters of the attribute of the attribute itself) can be retrieved at runtime via additional code and, as a byproduct, can give you access to the element they are applied to.
That last part is the key to what makes attributes special. Not only can you get a list of fields/classes/etc. where an attribute is applied, you’re able to essentially mark your code in a way that lets you retrieve any element from it at any time, without needing a direct reference to the element. It’s hard to talk about the usefulness of this without getting into specific examples, so let’s get into it!
Custom Attributes
Unity’s [Header], [Range], etc. are all custom attributes defined inside the Unity source code. C# itself does come with a fair amount of built-in attributes, but for the most part if you’re working with attributes you’ll be working with custom ones that you define.
Because we’re talking about metadata, and because of the slightly strange syntax, it may be easy to think that custom attributes themselves are hard to define. However, the opposite it true! When you call something like [Header("My Header Text")], you’re effectively calling the following code:
Header header = new Header("My Header Text");You’re just creating an object that is bound to the element the attribute is attached to. Creating a custom attribute is about as simple as the above code:
[System.AttributeUsage(System.AttributeTargets.Class |  System.AttributeTargets.Struct)]
public class CoolAttribute : System.Attribute {
    public string Value;
    public CoolAttribute(string value)
    {
        Value = value;
    }
}
You extend System.Attribute, and use the attribute System.AttributeUsage to declare what your custom attribute can be applied to (for more options see here). In the above code I’m making it so that CoolAttribute accepts and stores a string parameter in its constructor.
After defining the attribute above, you are immediately able to use it like so:
[CoolAttribute("some value")]
public class CoolClass {}
Retrieving Attributes
When you declare something like [Header("Cool Header")] in a Monobehaviour, you see some text in the inspector that says the thing you typed in (“Cool Header”, for example). It makes sense, but also…. what? How does that happen?
Part of the difficulty in learning attributes, especially for newcomers, is that to effectively use them, you need to know a bit about reflection. Reflection can be a strange concept — just saying it sounds like you’re tapping into the secret meta world of code. This is true, but it’s also misleading. All reflection does is get information about the code you wrote. This doesn’t mean 1s and 0s. It means that, for example, imagine this line:
public GameObject SuperAwesomeObject;Inside your code you may call SuperAwesomeObject.transform or whatever, but imagine you actually want to get the name “SuperAwesomeObject”. How do you find that? Reflection! The actual variable name, SuperAwesomeObject is data stored inside your compiled code. Most of the time, the actual name of this variable is irrelevant — we only care about what it’s referencing. However, you can use a similar method of retrieval to not grab the name of the variable, but to instead grab any attributes that are attached to it.
Imagine we had this class:
[CoolAttribute("foobar")]
public class CoolClass : MonoBehaviour {
  public int Number;
}
I want to get the attributes attached to CoolClass. I can do that like so:
// Get the "Type" of CoolClass as a variable by using typeof()
// Note: this does not create an instance of CoolClass. It instead gets its Type as a System.Type object.
var t = typeof(CoolClass);

// After you have the Type information of a class, you can get the attributes attached to the class by calling code like this:
System.Attribute[] attrs = System.Attribute.GetCustomAttributes(t);
// Note here as well that I'm getting the attributes of the class, not its fields/methods.
// I show examples of getting attributes from those in later examples

// attrs is now an array filled with all the attributes attached to the class CoolClass.
// To retreive the information stored in that attribute, we can loop over all the attributes in attrs (because there may be more than just the one we attached), and find our custom attribute:
foreach (System.Attribute attr in attrs) {  // loop through the attribute array
  if (attr is CoolAttribute) {  // if the attribute is the type we're looking for
    // We need to cast to our attribute type to the target type
    CoolAttribute a = (CoolAttribute)attr;
    Debug.Log(a.Value); // Would log "foobar"
  }
}
Working with attributes for more advance cases still starts with some version of the above code:
- Get a Type
- Get which parts of that type you want to look for attributes on (the class itself, methods, fields, structs, etc.)
- Use some version of System.Attribute.GetCustomAttributes() to fetch the attributes you want.
Knowing that, let’s move on to more concrete use cases.
Attribute Use Cases
Value Replacement (Localization, Data Management, Modding, etc.)
It’s often the case in game development, especially in localization, that you will want to replace some value with another value. Programming is generally good at this, but where this becomes complicated is that the ways those values are used, even if they all use the same source data, can vary greatly.
Traditional Method
Consider a string of text that you want to be localized to some language. To change that string for the proper language, you’d need to find any instance of that string. Not only that, but I’d need to find every version of that string — it could be hardcoded into a class, set in the inspector via TextMeshPro or legacy UI Text, set in some other asset’s inspectors settings, set via a function, and so on. Being able to simply change this value then becomes a messy knot not only of tracking where all these references to the text are, but then trying to contextually call the proper function to change these strings.
Attributes don’t make this problem go away, but they can make it far more manageable. Let’s imagine we have some class that looks like this:
public class TextClass {
    public TextMeshProUGUI TMPAsset;
}
An attribute-less way to change the text used by TMPAsset would require us to either maintain a reference to TMPAsset, or to give our code the following function:
public class TextClass {
    public TextMeshProUGUI TMPAsset;
    public void SetText(string newText) {
        TMPAsset.text = newText;
    }
}
This is not much better than holding a reference somewhere to TMPAsset, because, to call SetText() you still need a reference to the instance of TextClass that holds the asset you want to change. Again, this is not impossible, but consider if you had another class that also used not one but two TextMeshPro components:
public class AnotherTextClass {
    public TextMeshProUGUI AnotherTMPAsset;
    public TextMeshProUGUI YetAnotherTMPAsset;
    public void SetTextOne(string newText) {
        AnotherTMPAsset.text = newText;
    }
  public void SetTextTwo(string newText) {
        YetAnotherTMPAsset.text = newText;
    }
}
These presumably reference different TextMeshPro assets, but how do I know which class/instance/function/etc. to call if I want to change the text? Beyond this, having two components that need replaceable text is unrealistic — in a production game you can easily have hundreds of UI elements that need to be replaced, so any solution that can work for a handful elements does not necessarily scale to the needs of a full game.
Your solution here is have have a lot of tiny one-off scripts, megaclasses that store tons of references to any text object, or some combination of the above two elements that only results in pain and sadness.
Attribute Method
Lets instead try to use an attribute-oriented approach to solve this problem. First, I’ll create a new custom attribute that I’ll use as metadata to state that the attached field is one I’d want to change for different languages:
// Only allow this to attach to fields
[System.AttributeUsage(System.AttributeTargets.Field)]
public class ReplaceableText : System.Attribute {
    public string Key;
    public CoolAttribute(string key) {
        Key = key;
    }
}
I can now use this attribute on any field, like so:
public class AnotherTextClass {
  [ReplaceableText("forest_name")]
    public TextMeshProUGUI AnotherTMPAsset;
  [ReplaceableText("forest_creature")]
  public TextMeshProUGUI YetAnotherTMPAsset;
}
What I’m doing here is annotating the fields of my class to point to some key value in a translation table so that I can look up the value this asset needs to be when it needs to be changed. Some example table would be like this (but saved as a csv/json/etc. inside the project):
| Key | English | Spanish |
|---|---|---|
| forest_name | Forest | Bosque |
| forest_creature | Bunny | Conejito |
Once I’ve annotated these fields with my custom attribute, somewhere in my code, where relevant, I can not only use the ability to search for custom attributes as a way to know where the attribute is used, but access the reference in the field they are annotating (and change its value).
This is where attributes transcend boring “add author metadata” to a class and start to reveal themselves to be a superpower of C#. Look at this code:
public void SetupTranslations(object obj) {
  // Get the FieldInfo info from AnotherTextClass
  var fieldInfo = typeof(AnotherTextClass).GetFields();
  // Iterate through each FieldInfo
  foreach (var item in fieldInfo) {
    // Try to find a ReplaceableText attribute on the field
    var attr = System.Attribute.GetCustomAttribute(item, typeof(ReplaceableText));
    // If the attribute is not null, the attribute was found
    if(attr != null) {
      // Get the value of the field using our object reference and cast as TextMeshProUGUI
      var c = item.GetValue(obj) as TextMeshProUGUI;
      // Assign the TextMeshProUGUI.text value to the Key var of the attribute we created
      // If we used [ReplaceableText("forest_name")], the equivalent call would be:
      // c.text = GetTranslationValueForKey("forest_name");
      c.text = GetTranslationValueForKey(((ReplaceableText)attr).Key);
      // GetTranslationValueForKey() is a fake function, but presumably looks into a csv of translations and picks the value for a given key based on the language a player has selected
    }
  }
}
Assuming I have a reference to the the instance of the object I want the field values for, I can grab a reference to that class’s fields using only the attribute ReplaceableText. Once I’ve got that field reference, I can then assign the referenced item directly! So in the above code I’m using the value stored in the attribute [ReplaceableText("forest_creature")] (in this case “forest_creature”), and then assigning its value to the field that uses that attribute. Crazy!
Adding any new fields that need to be translated is as simple as adding the field in a class, and then adding in the attribute. No tracking references or updating some mega-class, no even adding scripts in the editor. It just works.
Again, this method can be used essentially anywhere. Given Unity’s weird lifecycle stuff with Monobehaviours and new, it could seem like the need to hold a reference to the object to get the field values is hard, but there are lots of ways around this.
For one, you could just create a “base” Monobehaviour that all your own Monobehaviours derive from, and in that classes’ Awake() call you could use item.GetValue(this). You could also use Events and invoke an event that uses your class as a parameter, consume that event elsewhere and then call the above method in some form.
You may also be thinking “well okay it works for TextMeshPro, do I need to make a new attribute/method/etc. for a different field type?” Nope! You can just modify the above function to do something like this:
public void SetupTranslations(object obj) {
  var fieldInfo = typeof(AnotherTextClass).GetFields();
  foreach (var item in fieldInfo) {
    var attr = System.Attribute.GetCustomAttribute(item, typeof(ReplaceableText));
    if(attr != null) {
      // Instead of hardcoding our assumption, switch on the type of field item is
      if(item.GetValue(obj) is TextMeshProUGUI) {
        var c = item.GetValue(obj) as TextMeshProUGUI;
        c.text = GetTranslationValueForKey(((ReplaceableText)attr).Key);
      }
      else if if(item.GetValue(obj) is UI.Text) {
        var c = item.GetValue(obj) as UI.Text;
        c.text = GetTranslationValueForKey(((ReplaceableText)attr).Key);
      }
    }
  }
}
You test the retrieved field against known types that would use that attribute. This can definitely get messy, especially if you work with other developers who aren’t aware of what your new attribute supports or doesn’t, but luckily you could also debug these issues pretty easily by adding a debug statement like this:
public void SetupTranslations(object obj) {
var fieldInfo = typeof(AnotherTextClass).GetFields();
foreach (var item in fieldInfo) {
var attr = System.Attribute.GetCustomAttribute(item, typeof(ReplaceableText));
if(attr != null) {
if(item.GetValue(obj) is TextMeshProUGUI) {
var c = item.GetValue(obj) as TextMeshProUGUI;
c.text = GetTranslationValueForKey(((ReplaceableText)attr).Key);
}
else if if(item.GetValue(obj) is UI.Text) {
var c = item.GetValue(obj) as UI.Text;
c.text = GetTranslationValueForKey(((ReplaceableText)attr).Key);
}
else {
Debug.LogError($"Unsupported field {item.name} used for ReplaceableText attribute");
}
}
}
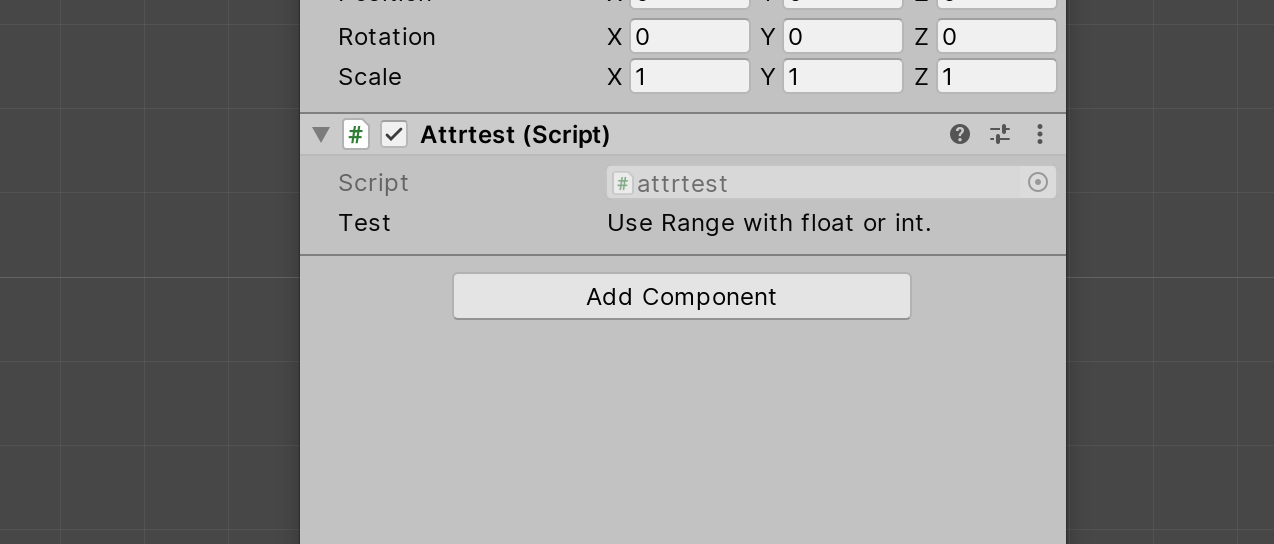
}Again this seems messy (and it is), but it is worth saying this is also similar to how Unity handles misuse of [Range]. When you try to apply it to an unsupported field type, the inspector turns into this:
Your code will still compile, so it’s in charge of the person who has made the attribute to try to enforce checks where necessary. To quote a recent blog post (and to reiterate my point that attributes make dealing with some problems nicer, not that they make problems go away), “Complexity has to live somwhere”.
You could use a similar system to annotate Image fields that look up a sprite sheet and chose an image size based on device size, replace an image with a custom user image, etc. This alone is worth pursuing, but there’s more.
Consider that, because I have access to the component, I also have access to GameObject it is a part of. This means that I can now call whatever functions on the GameObject the field references. Why would I want to do that? Let’s talk about what put me on this journey in the first place, tooltips.
Attributes for Dynamic Behavior (Add scripts when nobody is looking)
I’m making a strategy game, and if there is one thing strategy gamers all agree on, it’s that having good tooltips can make or break a game. Strategy especially prizes information transparency and consistency, so having the ability to hover over some mysterious number and see a breakdown of where its value comes from is strategy game nirvana.
However, strategy games also very often have a lot of UI — the underlying systems that govern the games are plentiful, and knowing about those systems and their states goes hand in hand with playing a strategy game. So instead of just a healthbar or something, you’ve got menus and tabs and numbers and buttons and switches, all that change game state and all that display some data coming from somewhere in your game. If each of these items needs its own tooltip, how do you tackle this problem?
The Traditional Way
To a lot of well-meaning and fantastic game devs that have shipped far more games than I is that each UI element needs its own unique script that can listen for updates and update its values accordingly. When people talk about how “UI coding is the worst”, it’s stuff like this they will point to, the fact you have a million small scripts that do one thing. A sample script that would be attached to only one out of possibly hundreds of elements may look like this:
public class UpdateTurnNumber : Monobehaviour {
  public void UpdateTurn(int turn) {
    GetComponent<Text>().text = turn.ToString();
  }
}
In order to update the turn number, you’d need to:
- Add this script to a GameObject that has the corresponding Text component on it
- Get a reference to that GameObject
- Get this component
- Call
UpdateTurnat the right time.
Repeat this literally hundreds of time and you can see the issue.
Let’s make it a little better by, instead of relying on a reference, we listen to some events and make this script capable of updating itself independently:
// Somewhere else I define a static Action I can use to alert listeners to new turns
public static class Events {
  static Action<int> NewTurn;
}

// Somewhere else I invoke that event
public class Match : Monobehaviour {
  int Turn = 0;
  void StartTurn() {
    Turn++;
    // Do turn start stuff and then invoke our event for listeners
    Events.NewTurn?.Invoke(Turn);
  }
}

public class UpdateTurnNumber : Monobehaviour {
  // We listen for that event here and update our UI accordingly
  void OnEnable() {
    Events.NewTurn += OnNewTurn
  }
  void OnDisable() {
    Events.NewTurn -= OnNewTurn
  }
  public void OnNewTurn(int turn) {
    GetComponent<Text>().text = turn.ToString();
  }
}
This is better, as we’ve gotten rid of the need to maintain a reference to our UI script in order to update its values. Let’s make this turn number hoverable as well:
using UnityEngine.EventSystems;

// Add in that this class implments the IPointerEnter and IPointerExit interfaces
// This allows this script to capture the moment a mouse hovers over it
// This also assumes that this GameObject has some component that allows it to be
// raycasted against
public class UpdateTurnNumber : Monobehaviour, IPointerEnterHandler, IPointerExitHandler {
  // We listen for that event here and update our UI accordingly
  void OnEnable() {
    Events.NewTurn += OnNewTurn
  }
  void OnDisable() {
    Events.NewTurn -= OnNewTurn
  }
  public void OnNewTurn(int turn) {
    GetComponent<Text>().text = turn.ToString();
  }
    public void OnPointerEnter(PointerEventData eventData) {
    ShowTooltip();
  }
  public void OnPointerExit(PointerEventData eventData) {
    HideTooltip();
  }
  // Not showing these functions, as they can vary a lot per use case
  void ShowTooltip(){...}
  void HideTooltip(){...}
}
Now, when I mouseover the GameObject that has this script, this script will call ShowTooltip, and when I mouse out it will call HideTooltip. I’m also not showing the interior of those functions because it would deal with Tooltip specific code, which can vary greatly depending on your project.
And this… works! There’s nothing inherently wrong with this code, and again, many game have likely shipped with some version of this script on all their UI elements. But seriously consider the magnitude here — if you’ve got a UI with any substantial number of UI elements that you want users to peek into with a hover, you’re making a one-off script like this for each individual UI element.
You can look at a game like Civilization and, without even opening any menus, I can easily count ~30 elements that would need their own version of this script:

Add in more menus/sub-menus, etc. and you’re looking at a ton of one-off scripts that clutter a project and can also be a pain to maintain. Most people just deal with this, and that’s fine, but I was determined to find a better way, and through attributes, have found a solution that, again, doesn’t get rid of the problem, but makes managing it a whole lot better.
Better with Attributes
What we really want here is some ability to reuse elements. Having to make a unique script for each element is a pain and hard to maintain, so ideally we’d be able to batch their functionality somehow.
To get started, let’s look at the UpdateTurnNumber class again:
public class UpdateTurnNumber : Monobehaviour, IPointerEnterHandler, IPointerExitHandler {
  void OnEnable() {
    Events.NewTurn += OnNewTurn
  }
  void OnDisable() {
    Events.NewTurn -= OnNewTurn
  }
  public void OnNewTurn(int turn) {
    GetComponent<Text>().text = turn.ToString();
  }
  public void OnPointerEnter(PointerEventData eventData) {
    ShowTooltip();
  }
  public void OnPointerExit(PointerEventData eventData) {
    HideTooltip();
  }
  void ShowTooltip(){...}
  void HideTooltip(){...}
}
If we break down what this script is doing, conceptually, we have two major functions:
- It listens for pointer input
- It gets updated based on some event
NOTE: Before we continue, I want to note that what follows is very subjective. There are a lot of ways to do what I’m going to suggest, so do not read what I’m saying as prescriptive.
Listening for pointer input and getting updated based on some data are functions that likely all UI classes would share. Instead of combining the two functions of UpdateTurnNumber into a single class, we can break out some of its functionality that we know elements will share into a separate base class.
Using Inheritance for Base UI Functionality
Though inheritance isn’t a great tool for game development, we can reduce the overhead of writing hundreds of small UI scripts by giving any new script some baseline functionality that is inherited from a base class. Let’s make a simple base UI class that listens for new turn data, and have ÙpdateTurnNumber extend that class:
public abstract class BaseUI : Monobehaviour {
  void OnEnable() {
    Events.NewTurn += OnNewTurn
  }
  void OnDisable() {
    Events.NewTurn -= OnNewTurn
  }
  protected virtual void OnNewTurn(int turn){}
}

public class UpdateTurnNumber : BaseUI, IPointerEnterHandler, IPointerExitHandler {
  protected override void OnNewTurn(int turn) {
    GetComponent<Text>().text = turn.ToString();
  }
  public void OnPointerEnter(PointerEventData eventData) {
    ShowTooltip();
  }
  public void OnPointerExit(PointerEventData eventData) {
    HideTooltip();
  }
  protected override void ShowTooltip(){...}
  protected override void HideTooltip(){...}
}
The thinking here is that we may have other elements that care about what turn it is. We could add in more events to our base class as well and also have them call other virtual methods that child classes could implement to update their data. Any class that now extends BaseUI can access data about a turn.
Next, let’s assume that this Turn UI element is actually part of larger panel of elements that always display together (an info panel for a unit, some global match data, or something similar). In this class we would hold a reference to any elements on this panel, such that we could easily toggle them on/off depending on the game state. That class may look something like this:
public class InfoPanel : Monobehaviour {
  public UpdateTurnNumber TurnNumberElement;
  public void OnShow() {
    TurnNumberElement.gameObject.SetActive(true);
  }
  public void OnHide() {
    TurnNumberElement.gameObject.SetActive(false);
  }
}
If we know ahead of time that TurnNumberElement is going to want to listen to new turn data, let’s instead extend BaseUI in InfoPanel, and then pass our data to TurnNumberElement. This allows us to centralize the data flow to UI elements, so instead of each acting individually, all information flows through InfoPanel and into its referenced elements. This means we’d have the following classes:
public abstract class BaseUI : Monobehaviour {
  void OnEnable() {
    Events.NewTurn += OnNewTurn
  }
  void OnDisable() {
    Events.NewTurn -= OnNewTurn
  }
  protected virtual void OnNewTurn(int turn){}
}

public class InfoPanel : BaseUI {
  // Change the reference here to directly refrence the element we want to use
  public TextMeshProUGUI TurnNumberElement;
  public void OnShow() {
    TurnNumberElement.gameObject.SetActive(true);
  }
  public void OnHide() {
    TurnNumberElement.gameObject.SetActive(false);
  }
  protected override void OnNewTurn(int turn) {
    TextMeshProUGUI.text = turn.ToString();
  }
}

public class UpdateTurnNumber : Monobehaviour, IPointerEnterHandler, IPointerExitHandler {
  // remove turn setting functionality from this class
  public void OnPointerEnter(PointerEventData eventData) {
    ShowTooltip();
  }
  public void OnPointerExit(PointerEventData eventData) {
    HideTooltip();
  }
  protected override void ShowTooltip(){...}
  protected override void HideTooltip(){...}
}
This is definitely nicer, as now, to make any new UI script, all we need to do is… wait. What happened to UpdateTurnNumber? Looking at it in the above code, it now knows nothing about Turns, and is only a script that gives us PointerData functionality. The script is now effectively this:
// Same as UpdateTurnNumber, just changed name
public class TooltipListener : Monobehaviour, IPointerEnterHandler, IPointerExitHandler {
  public void OnPointerEnter(PointerEventData eventData) {
    ShowTooltip();
  }
  public void OnPointerExit(PointerEventData eventData) {
    HideTooltip();
  }
  protected override void ShowTooltip(){...}
  protected override void HideTooltip(){...}
}
We could delete the script from our GameObject now, as we can just change its value in InfoPanel, but we do still want the ability to use Tooltips for the element, as that was our whole goal in the first place.
Assuming we keep the script, how is UpdateTurnNumber/TooltipListener supposed to show any data in ShowToolip? We could add back in the function that gets the element on the same GameObject that holds our data, but then we’re back to needing a unique script for every UI element.
BUT we don’t actually want just a generic script, we need it to hold some info to display for a tooltip. Does it now need a reference back to InfoPanel? What we ideally want in this scenario is for UpdateTurnNumber to be able to show a tooltip with a turn number, but if we don’t know what turn it actually is (via reference to its field, reference back to the panel, etc.), what do we do?
Really Using Attributes
And finally, we get to where Attributes can solve a real-world code issue that usually is seen as just “the way things have to be”.
Let’s make a new attribute:
[System.AttributeUsage(System.AttributeTargets.Field)]
public class CustomTooltipAttribute : System.Attribute {
    public string Data;
    public CustomTooltipAttribute(string data) {
      Data = data;
    }
}
This defines a new attribute called CustomTooltipAttribute that takes in a data string. Simple enough, but, where should we use it? Let’s attach it to the field in our InfoPanel that we know needs a tooltip:
public class InfoPanel : BaseUI {
  // Attribute class names conventionally are __Attribute, but when using the attribute
  // you can omit the "Attribute" part of the name
  // This is also what allows RangeAttribute to just be [Range]
    [CustomTooltip("Turn Number")]
  public TextMeshProUGUI TurnNumberElement;
  public void OnShow() {
    TurnNumberElement.gameObject.SetActive(true);
  }
  public void OnHide() {
    TurnNumberElement.gameObject.SetActive(false);
  }
  protected override void OnNewTurn(int turn) {
    TextMeshProUGUI.text = turn.ToString();
  }
}
Now, lets get that attribute in BaseUI:
public abstract class BaseUI : Monobehaviour {
  void OnEnable() {
    Events.NewTurn += OnNewTurn
    SetupAttributes(); // Call the attribute setup function in OnEnable()
  }
  void OnDisable() {
    Events.NewTurn -= OnNewTurn
  }
  protected virtual void OnNewTurn(int turn){}

  void SetupAttributes() {
    // Get the fieldinfo of this class — this will also have child class fields
    var fieldInfo = this.GetType().GetFields();
    foreach (var item in fieldInfo) {
      // Get our attribute
        var attr = System.Attribute.GetCustomAttribute(item, typeof(CustomTooltipAttribute));
        if(attr != null) {
        if(item.GetValue(obj) is TextMeshProUGUI) {
          // Instead of setting a value here, let's instead add our TooltipListener script
            var c = item.GetValue(obj) as TextMeshProUGUI;
          c.gameObject.AddComponent<TooltipListener>();
        }
      }
    }
  }
}
Now we’re cooking. To state what’s happening plainly:
- We annotate our
TurnNumberElementfield inInfoPanelwithCustomTooltipAttribute - In the
BaseUIclass, thatInfoPanelextends, we look for instances ofCustomTooltipAttribute. - For each of those found instances, we then access the underlying GameObject that that field references.
- To that accessed GameObject, we then add the
TooltipListenerscript.
This means we don’t ever need to manually add a TooltipListener script to a referenced UI Element to give that UI tooltip functionality, ever.
This gets rid of part of our problem, the need to add a script manually to any element that we want to be tooltipable.
But once again, it gets better. CustomTooltipAttribute takes in data as a string to define the data of a given tooltip. We can easily pass that data to the TooltipListener like so:
First, we edit the TooltipListener class to accept some data:
public class TooltipListener : Monobehaviour, IPointerEnterHandler, IPointerExitHandler {
  string Data;
  public void OnPointerEnter(PointerEventData eventData) {
    ShowTooltip();
  }
  public void OnPointerExit(PointerEventData eventData) {
    HideTooltip();
  }
  public void SetData(string data) {
    Data = data;
  }
  protected override void ShowTooltip() {
    // Pass Data to whatever way we show tooltips
  }
  protected override void HideTooltip(){...}
}
Then we just call SetData() using the attribute’s field:
// From inside BaseUI
void SetupAttributes() {
    var fieldInfo = this.GetType().GetFields();
    foreach (var item in fieldInfo) {
        var attr = System.Attribute.GetCustomAttribute(item, typeof(CustomTooltipAttribute));
        if(attr != null) {
        if(item.GetValue(obj) is TextMeshProUGUI) {
            var c = item.GetValue(obj) as TextMeshProUGUI;
          // Grab the data from the attribute (set with [Tooltip("Turn Number")])
          var data = ((CustomTooltipAttribute)attr).Data;
          c.gameObject.AddComponent<TooltipListener>().SetData(data);
        }
      }
    }
  }
This means that any calls to ShowToolip in the TooltipListener script will be able to show the data defined in the attribute! Not only this, but the data can vary based on whatever is passed into the attribute.
Additionally, adding a new tooltip is as easy as annotating another field with the same attribute. If I needed to add unique tooltips for any new referenced elements, instead of needing to find their locations in the editor and manually adding and maintaining unique scripts, I could easily just do this:
public class OtherUI : BaseUI {
    [CustomTooltip("Cool value")]
  public TextMeshProUGUI SomeText;

  [CustomTooltip("Another value")]
  public TextMeshProUGUI MoreText;

  [CustomTooltip("Seriously Cool value")]
  public TextMeshProUGUI EvenMoreText;

  [CustomTooltip("Way Cool value")]
  public TextMeshProUGUI OkayEnoughText;
}
I’ve just added tooltips to those fields, without having to touch the Editor. Additionally, the same switching on field type can still happen, it isn’t just limited to TextMeshPro/UI.Text, etc. Anything that now extends BaseUI can get similar tooltip functionality. Nice!
Advanced Procedural Tooltips
Okay, last bit of hot knowledge about attributes before I start to wind down this post. If you notice from the above code, the data passed into [CustomTooltipAttribute] is constant. Having our added TooltipListener script have some string data associated with it doesn’t somehow magically get us the turn number. Right now, if I was to call ShowTooltip for that element, I’d get "Turn Number", not that actual turn number. Why did I do it like this?
As much as I love attributes, attributes have very real limitations. Namely, attributes cannot have variables in their constructors. I can’t just pass my TurnNumber variable or event or anything into the the constructor of the attribute because anything passed to an attribute constructor needs to be a simple type/literal. This is very limited, meaning you can only use these the following values directly in an attribute constructor:
bool, int, double, string, Type, enums, etc and arrays of those types
So what do you do?
Again, full disclosure that this solution is subjective, but I’ve found a simple solution through using enums to look up values in the Listener. In the listener script, I do something like this:
public class TooltipListener : Monobehaviour, IPointerEnterHandler, IPointerExitHandler {
  // Define an enum to lookup values with
  public enum TooltipValue {
    TurnNumber,
    PlayerName
  }
  // Store the value on setup
  TooltipValue tooltipValue;

  public void OnPointerEnter(PointerEventData eventData) {...}
  public void OnPointerExit(PointerEventData eventData) {...}

  // Change set data to take in the target enum
  // Could also still pass header data or whatever else with more params
  public void SetData(TooltipValue value) {
    tooltipValue = value;
  }
  protected override void ShowTooltip() {
    switch(tooltipValue) {
      case TooltipValue.TurnNumber:
        // Look up turn number and pass to tooltip
        break;
      case TooltipValue.PlayerName:
        // Lookup player name and pass to tooltip
        break;
    }
  }
  protected override void HideTooltip(){...}
}
Then in my actual attribute constructor I can change it to require a TooltipListener.TooltipValue:
[System.AttributeUsage(System.AttributeTargets.Field)]
public class CustomTooltipAttribute : System.Attribute {
    public TooltipListener.TooltipValue Data;
    public CustomTooltipAttribute(TooltipListener.TooltipValue value) {
      Data = data;
    }
}
Then in my class that uses the attributes I can change their constructor params to take in the value that needs to be reflected in the Tooltip:
public class OtherUI : BaseUI {
    [Tooltip(TooltipListener.TooltipValue.TurnNumber)]
  public TextMeshProUGUI TurnNumber;

    [Tooltip(TooltipListener.TooltipValue.PlayerName)]
  public TextMeshProUGUI PlayerName;
}
When ShowToolip() is called on the added TooltipListener scripts, those tooltips, despite being “generic” are able to serve unique data to the tooltip via the value used in the attribute’s constructor!
There are lots of other ways to structure this sort of of setup, but the general idea remains the same. You’re setting the actual field values in a single class like InfoPanel, and annotating those fields with attributes to give them extra functionality.
How [Range] Works
Though I’ve written over four thousand words at this point on attributes, I’m still only scratching the surface of their myriad uses. To wrap up this post I wanted to go back to [Range] and demystify (and hypothesize based on what we can know) how it works.
[Range] gives any int or float field it attaches to a nice little slider in the inspector. Knowing what we know now from everything above, we can assume that, somewhere in the base inspector class, Unity looks for any fields in the current inspector and that have [Range] attached to them, and then applies their own CustomPropertyDrawer for anything with [Range].
Looking at Unity’s own source code on Github, we can confirm this here. They basically search for any CustomPropertyDrawer attributes on any types derived from GUIDrawer (of which PropertyDrawer, the class RangeDrawer extends, does), then do some backend Unity inspector drawing stuff to basically say that “Because this property has a CustomProperyDrawer attribute, use the drawer defined in this class for the type that the CustomPropertyDrawer constructor indicates this drawer should be used for, instead of the default drawer for that type.”
This system functions similar to our BaseUI method, though Unity has the benefit here of already having access to all the underlying objects and such of your code so they can call this under any inspector. We’ve got to hack it a little bit to get our references to the objects we want for our own versions of something similar, but it’s not impossible.
Conclusion
I hope that from the above you’ve gotten more than a good taste of what’s possible with C#’s attributes. Their uses go far beyond what Unity provides, and can make your life easier in so many ways with your own code. Again, I’ve only scratched the surface here of what they can be used for, so if you have any especially crazy use cases I’d love to know!
Lastly, this post wouldn’t have been possible without some other people talking about/blogging on the subject in some form in the past. I did my best here to synthesize a lot of information that exists in various places, so a big shoutout to posts/repos that made this possible:
- NaughtyAttributes source code
- EasyButtons source code
- Garry’s blog on Networking
- Unity source code
- Unity forum posts / StackOverflow 1 2 3 4
Again, thanks so much for reading and hope you find this helpful!
Also, breaking news that is attribute related! Microsoft recently announced Source Generators that give C# Haxe-like macro functionality. Knowing how to use attributes will likely be key for getting especially werid with this new functionality, and I’m personally very excited about what this could unlock for game development!
Date
May 4, 2020Previously
A Brief Introduction to the OSR and Some Recommendations Talking about some things I like in OSRsubscribe to my newsletter to get posts delivered directly to your inbox